1. Kupu Whakataki
This manual provides essential instructions for the safe and efficient operation, setup, and maintenance of your KATOOL ME-T450 Tire Changer and ME-B620 Wheel Balancer Combo Machine. Please read this manual thoroughly before operating the equipment to ensure proper usage and to prevent injury or damage.
The KATOOL ME-T450/B620 combo machine is designed for professional tire repair and wheel changing in garage and workshop environments. It combines a robust tire changer with a precise wheel balancer to streamline your tire service operations.

Figure 1: KATOOL ME-T450 Tire Changer and ME-B620 Wheel Balancer Combo Machine.
2. Nga Tohutohu Haumaru
WHAKATŪPATO: Ki te kore e whai i enei tohutohu haumaru ka puta he whara nui, he mate ranei.
- Me mau tonu ngā taputapu tiaki whaiaro (PPE) e tika ana, tae atu ki ngā mōhiti haumaru, ngā karapu, me ngā pūtu maitai.
- Ensure the machine is properly grounded and connected to the correct power supply as specified in the electrical requirements.
- Maintain a clear and well-lit work area. Keep children and unauthorized personnel away from the equipment.
- Do not operate the machine if any parts are damaged or missing. Contact customer support for replacement parts.
- Ensure adequate air pressure is supplied to the tire changer.
- Never place hands or tools near moving parts during operation.
- Always deflate tires completely before attempting to demount them.
- Use caution when handling heavy wheels and tires to prevent strain or injury.
- Regularly inspect air lines, electrical cords, and hydraulic components for wear or damage.
3. He aha kei roto i te Pouaka
Your KATOOL ME-T450/B620 combo machine package includes the following main components:
- KATOOL ME-T450 Tire Changer Unit
- KATOOL ME-B620 Wheel Balancer Unit
- Mounting Head (for tire changer)
- Bead Breaker (for tire changer)
- Foot Pedals (for tire changer)
- Wira Clamps (for tire changer)
- Inflation Gauge with Pedal Control (for tire changer)
- Shaft and Mounting Accessories (for wheel balancer)
- Pukapuka Kaiwhakamahi (tenei tuhinga)
- Necessary power cables and air hoses
4. Whakatakotoranga Hangarau
4.1. KATOOL ME-T450 Tire Changer
| Āhuahira | Whakatakotoranga |
|---|---|
| External Locking Rim Dimensions | 12"-20" |
| Internal Locking Rim Dimensions | 22"-24" |
| Te Mahi Mahi | 0.8MPA |
| Ahu | 38.5" x 30" x 35.8" |
| Max. Tyre Diameter | 960MM / 38" |
| Te Mana Motini | 0.75KW-1.1KW (220V/1PH/1.5HP for North America) |
| Max. Tyre Width | 280MM / 11" |
| Table Top Rotation Speed | 7/MIN |
| Haruru Mahi | <70DB |
| Te Ope Whakawhati Pirepire | 2500KG |
| Taumaha Kupenga | 203KG |
4.2. KATOOL ME-B620T Car Wheel Balancer
| Āhuahira | Whakatakotoranga |
|---|---|
| Taumaha Wira Mōrahi | 65kg / 144 lbs |
| Te Mana Motini | 250w |
| Voltage | 110V / 1PH |
| Te Whakataurite Tika | 1g |
| Tere Hurihuri | 210rpm |
| Rim Diamita | 10" ~ 24" (254 ~ 610mm) |
| Whanui Rim | 1.5" ~ 20" (38 ~ 508mm) |
| Wā Whakataurite | 8-10s |
| Haruru | <70dB(A) |
| Taumaha Kupenga | 105kg |
| Te Mahana Mahi | 0 ~ 50 ℃ |
5. Tatūnga me te Tāuta
5.1. Te Wetewete me te Tirotiro
- Carefully unpack all components and verify against the 'What's in the Box' section.
- Inspect for any shipping damage. Report any damage immediately to the carrier and supplier.
5.2. Whakaritenga Pae
- Choose a level, stable, and well-ventilated area for installation.
- Ensure sufficient space around both machines for safe operation and maintenance.
- Verify that the electrical supply matches the machine's requirements (220V/1PH for tire changer, 110V/1PH for wheel balancer).
- Ensure access to a compressed air supply with a minimum working pressure of 0.8MPA.
5.3. Assembly (General Guidelines)
While specific assembly steps may vary, generally:
- Attach the vertical column and swing arm to the tire changer base.
- Connect the air supply to the tire changer's filter/regulator unit.
- Mount the bead breaker and foot pedal assembly.
- For the wheel balancer, ensure the shaft and mounting accessories are securely in place.
- Connect both machines to their respective power outlets.

Figure 2: Wheel balancer shaft dimensions for proper wheel mounting.

Figure 3: The extension point on the balancer base helps prevent tipping with larger tires.
6. Operating the ME-T450 Tire Changer
6.1. Te Whakarite i te Wira me te Tāia
- Tangohia te uho o te takirere hei whakangawari rawa i te potae.
- Apply tire lubricant to both beads of the tire.
6.2. Bead Breaking
- Whakanohoia te wira ki runga i te ringa pakaru pīni.
- Press the bead breaker pedal to activate the bead breaker shovel, separating the tire bead from the rim.
- Repeat for both sides of the tire.

Figure 4: The bead breaker effectively separates the tire from the rim.
6.3. Mounting the Wheel on the Turntable
- Place the wheel onto the turntable, ensuring it is centered.
- Whakamahia te pētera waewae hei whakahohe i te clamps, securing the wheel firmly to the turntable. The clamps are adjustable to adapt to various tire sizes.

Figure 5: Adjustable clamps on the turntable secure the wheel.

Figure 6: Foot pedals provide control over turntable rotation and clamping.
6.4. Demounting the Tire
- Whakaturia te pane whakapiri ki runga ake i te taha o te awhi.
- Whakamahia he rīwhi potae hei hura i te pītiti o runga ki runga ake i te pane whakamau.
- Hurihia te tēpu hurihuri mā te whakamahi i te pātara waewae hei tango katoa i te pirepire o runga.
- Repeat for the bottom bead.
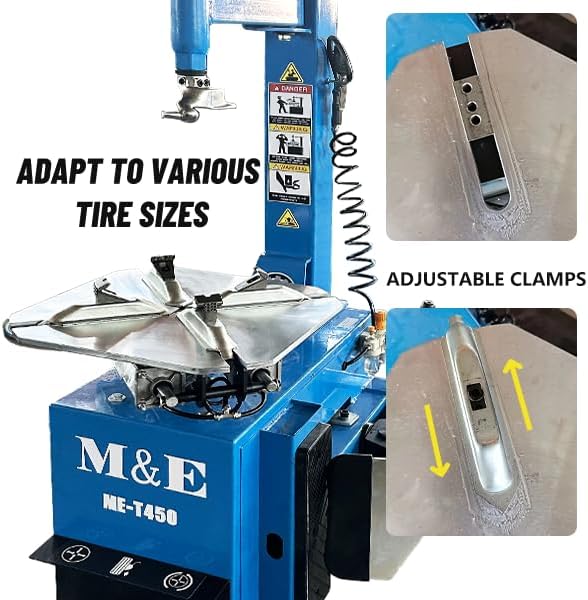
Figure 7: The tire changer adapts to various tire sizes with adjustable clamps.
6.5. Mounting a New Tire
- Apply tire lubricant to the beads of the new tire and the rim.
- Position the bottom bead under the mounting head.
- Rotate the turntable to mount the bottom bead.
- Position the top bead under the mounting head and rotate the turntable to mount it.
6.6. Tire Inflation
- Reinstall the valve core.
- Use the integrated inflation gauge with pedal control to inflate the tire to the manufacturer's recommended pressure.
- Monitor the pressure carefully to avoid over-inflation.
7. Operating the ME-B620T Wheel Balancer
7.1. Te Whakamau i te Wira
- Clean the wheel and tire assembly thoroughly.
- Mount the wheel onto the balancer's shaft, ensuring it is centered and securely fastened using the appropriate cones and quick-release nut.
- The φ36mm shaft thread is quenching treated for high strength.

Figure 8: Reverse fitting for wheel mounting on the balancer shaft.
7.2. Inputting Wheel Data
- Input the rim diameter, rim width, and distance from the machine to the rim using the control panel.
- The ME-B620T supports various balance modes for different rim types, ensuring precision.
7.3. Te Tīmatanga o te Huringa Taurite
- Close the wheel guard (if applicable) and press the START button.
- The machine will spin the wheel and measure imbalances. Balancing time is typically 8-10 seconds.
7.4. Te Whakamahi i ngā Taumaha Taurite
- The display will indicate the amount and location for weight placement on both the inner and outer sides of the rim.
- Carefully apply the correct balance weights.
- Perform a re-spin to verify the balance. Repeat if necessary until the display shows zero or minimal imbalance.
8. Tiaki
Regular maintenance ensures the longevity and optimal performance of your KATOOL combo machine.
8.1. Tiaki i ia ra
- Clean the turntable, mounting head, and bead breaker of the tire changer.
- Wipe down the wheel balancer and ensure the shaft is clean.
- Check air pressure and oil levels in the lubricator (if applicable).
8.2. Weekly/Monthly Maintenance
- Lubricate moving parts of the tire changer (e.g., clamps, swing arm pivot points) as per manufacturer recommendations.
- Inspect all electrical connections and air hoses for wear, leaks, or damage.
- Check the tightness of all bolts and fasteners.
- For the wheel balancer, perform self-calibration as needed. The machine has built-in fault diagnosis and self-calibration programs.
8.3. He Tuhipoka Nui
- The mounting head is made of stainless steel, solution-treated and interface-polished, and includes a plastic cover to protect the rim.
- The top-level motor and pure copper winding ensure fast heat dissipation, low defect rate, and longer service life for both machines.
- The wheel balancer's computer board adopts advanced welding technology, making it moisture-proof, dust-proof, and anti-static for extended life.
9. Te Raru
Kei roto i tēnei wāhanga ngā take noa me ā rātou otinga pea. Mō ngā raruraru kāore i te rārangihia i konei, whakapā atu ki te tautoko kiritaki.
| Raruraru | Take pea | Rongoā |
|---|---|---|
| Tire Changer not powering on | No power supply; tripped breaker; faulty switch | Check power connection; reset breaker; contact technician |
| Bead Breaker not operating | Insufficient air pressure; air leak; faulty pedal | Check air supply and connections; inspect for leaks; replace pedal if necessary |
| Papa hurihuri kaore i te hurihuri | Motor issue; electrical fault; obstruction | Check motor connections; remove obstructions; contact technician |
| Ngā pānui hē a te Wheel Balance | Improper wheel mounting; incorrect data input; machine needs calibration | Re-mount wheel securely; verify data input; perform self-calibration |
| Excessive vibration during balancing | Loose mounting; damaged wheel/tire; machine not level | Ensure secure mounting; inspect wheel/tire for damage; check machine leveling |
10. Pūtāhui me te Tautoko
Your KATOOL ME-T450/B620 combo machine is backed by a manufacturer's warranty. Please refer to the warranty card included with your purchase for specific terms and conditions.
For technical assistance, parts, or service inquiries, please contact KATOOL customer support through the following channels:
- Webpae: Visit the official KATOOL webpae mo nga rauemi tautoko me nga korero whakapā.
- Īmēra: Tirohia ngā tuhinga hoko mō te wāhitau īmēra ratonga kiritaki.
- Waea: Consult your product packaging or warranty card for the customer support phone number.
When contacting support, please have your product model (ME-T450/B620) and purchase date readily available.


