1. Kupu Whakataki
This manual provides comprehensive instructions for the installation, operation, and maintenance of your AERMEC AER503IR built-in thermostat. Please read this manual carefully before installation and use to ensure proper function and safety.
The AERMEC AER503IR is designed for built-in installation in a 503 box and features a touchpad control with a backlit display, specifically for air conditioning systems.
2. Nga korero haumaru
- Always disconnect power before installing or servicing the thermostat.
- Ko te whakaurunga me mahi e tetahi tohunga hiko i runga i nga tikanga katoa o te rohe me te motu.
- Do not touch the electronic board with bare hands to avoid damage from electrostatic discharge.
- Ensure all wiring connections are secure and correct to prevent fire or electric shock.
- Do not overtighten the fixing screws during installation.
- Kua hoahoatia tenei taputapu mo te whakamahi o roto anake.
3. Hua Neke Atuview
The AERMEC AER503IR thermostat features a clear digital display and intuitive touchpad controls for managing your air conditioning system.

Whakaahua 3.1: Mua view of the AERMEC AER503IR thermostat, showing the digital display and touchpad controls.
Āhuatanga matua:
- Touchpad control for easy operation.
- Whakaaturanga whakamārama-muri mō te tirohanga i roto i ngā āhuatanga rama rerekē.
- Designed for air conditioner specific use.
- Manual control type.
4. Tāutanga
The AERMEC AER503IR is designed for built-in installation in standard 502 (2-module) and 503 (3-module) flush-mounted boxes. Follow these steps for proper installation:
- Me mohio kua momotuhia te hiko i te waahi ara iahiko matua i mua i te tiimata o te whakaurunga.
- Open the AER503IR accessory using a flat-head screwdriver as shown in the diagram.
- Carefully remove the protective film from the display after installation is complete.
- Mount the thermostat into the chosen flush-mounted box (502, 503, or round 2-module box) using the provided screws. Ensure the "ALTO-UP" indicator is facing upwards.
- Connect the wiring according to the wiring diagram in Section 5.
- Secure the thermostat firmly but do not overtighten the fixing screws.

Figure 4.1: Installation steps for the AERMEC AER503IR thermostat into various flush-mounted boxes (502, 503, and round 2-module). Note the "ALTO-UP" orientation and the use of a screwdriver to open the unit.
5. Hoahoa Waea
Refer to the following diagram for electrical connections (I/O characteristics). Ensure all connections are made correctly before restoring power.
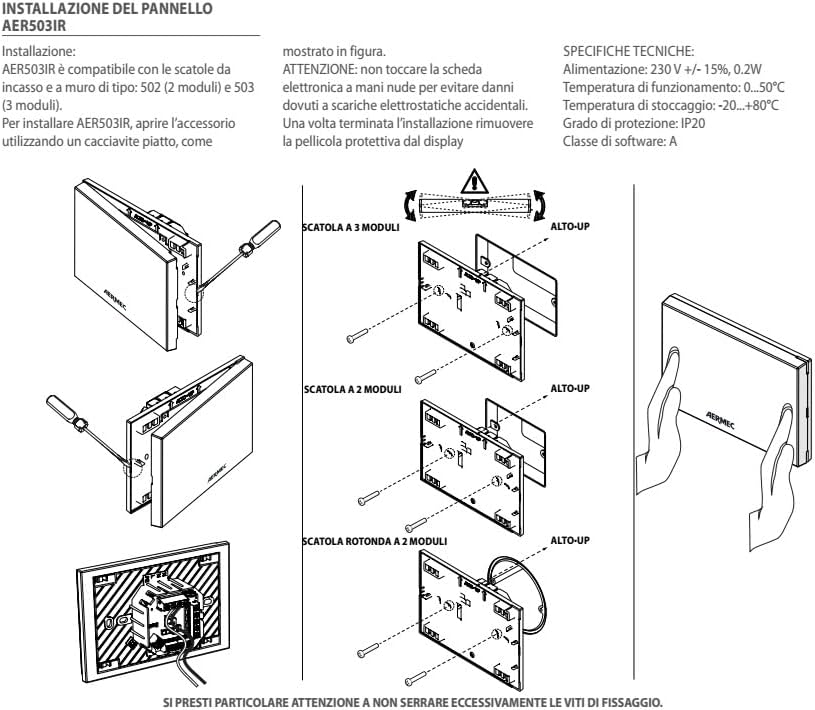
Figure 5.1: Electrical wiring diagram for the AERMEC AER503IR thermostat, detailing input/output connections for fan speed control, valve control, power supply, and sensor inputs.
Ira Hononga:
- N: Neutral input for power supply and valves.
- L: Line input for power supply.
- PE: Power supply ground.
- Y2, Y1, V1, V2, V3: Outputs for fan speed control (minimum, medium, maximum) and valve control (2-pipe, 4-pipe, resistance/Coldplasma).
- DC1, DC2: Analog outputs (0-10Vdc) for inverter fan control and modulating valve control.
- SA: Additional ambient probe input.
- GND: Ground for additional ambient probe and water probe.
- SW: Water probe input.
- CE1, CE2: Multifunction input (refer to dedicated chapter for functions).
6. Tatūnga Tuatahi
After successful installation and power restoration, the thermostat will power on. The backlit display will illuminate. Follow the on-screen prompts or refer to the full product manual for detailed initial configuration steps, including setting the current time, day, and desired temperature range.
- Whakahiko: Once wired correctly and power is supplied, the thermostat display should light up.
- Tautuhinga Taketake: Use the touchpad controls to navigate through the menu. Typically, you will need to set the current time, day of the week, and desired temperature setpoints for heating and cooling modes.
- Kōwhiringa Aratau: Select the operating mode (e.g., Cool, Heat, Auto, Fan Only) as required for your air conditioning system.
7. Mahi
The AERMEC AER503IR thermostat is operated via its integrated touchpad. The backlit display provides clear feedback on current settings and status.
Mana Taketake:
- Te Whakarerekenga Pawera: Use the up/down arrows on the touchpad to adjust the desired temperature setpoint.
- Kōwhiringa Aratau: Press the mode button to cycle through available operating modes (e.g., Cooling, Heating, Fan, Auto).
- Tere Kiri: If applicable, use the fan button to select desired fan speed (e.g., Low, Medium, High, Auto).
- Whakaatu Maama Whakamuri: The display is backlit for easy viewing.
For advanced programming features, such as scheduling or specific fan operations, please consult the detailed product manual provided with your thermostat.
8. Tiaki
The AERMEC AER503IR thermostat requires minimal maintenance to ensure optimal performance and longevity.
- Te horoi: Gently wipe the display and touchpad with a soft, dry, or slightly damp cloth. Do not use abrasive cleaners, solvents, or chemical sprays, as these can damage the surface or internal components.
- Tango Puehu: Periodically, gently dust the vents (if any) to ensure proper airflow and temperature sensing.
- Whakakapinga Pūhiko: If your model is battery-powered, replace batteries when the low battery indicator appears on the display. Use the specified battery type.
- Tirotiro Ngaio: It is recommended to have your HVAC system and thermostat inspected by a qualified technician annually to ensure efficient operation.
9. Te Raru
If you encounter issues with your AERMEC AER503IR thermostat, refer to the following common problems and solutions. For more complex issues, contact customer support.
| Raruraru | Take pea | Rongoā |
|---|---|---|
| Ko te whakaaturanga Thermostat he watea. | No power supply; loose wiring; dead batteries (if applicable). | Check circuit breaker. Verify wiring connections. Replace batteries. |
| Kāore te pūnaha e aro ki ngā tautuhinga o te thermostat. | Incorrect mode selected; wiring issue; system malfunction. | Ensure correct mode (Cool/Heat/Auto). Check wiring. Consult HVAC technician. |
| Ko te ahua o te panui i te pāmahana he he. | Thermostat located near heat source/draft; sensor issue. | Ensure thermostat is not exposed to direct sunlight or drafts. Contact support if issue persists. |
| Touchpad unresponsive. | Temporary glitch; physical damage. | Try cycling power to the thermostat. If damaged, contact support for replacement. |
10. Whakatakotoranga
| Āhuahira | Taipitopito |
|---|---|
| Waitohu | AERMEC |
| Ingoa Tauira | Termostato AER503IR |
| Tauira Tuemi | TX |
| Tae | Mā |
| Voltage | 230 Volts |
| Āhuahira Motuhake | Whakamuri |
| Taumaha Tūemi | 1 Kirokaramu |
| Momo Kaiwhakahaere | Mana a-ringa |
| Whakamahinga Hua Tauwhāiti | Whakarererangi |
| Momo Mana Pawera | Mamati |
| Nga Waahanga kei roto | Pouaka whakairi |
| Puna Mana | Pūhiko Powered |
| Ahu mōkihi | 20 x 10 x 10 cm |
Panui: Ka panoni nga whakaritenga ka kore he panui.
11. Pūtāhui me te Tautoko
For warranty information and technical support, please refer to the documentation included with your purchase or visit the official AERMEC webpae. Puritia to tohu hoko mo nga kereme whakamana.
Mōhiohio Whakapā: Tirohia te paetukutuku mana a te kaihanga website or your local distributor for contact details regarding customer service and technical assistance.


