1. Kupu Whakataki
Thank you for choosing the WilTec Wall Mount Bicycle Rack. This manual provides essential information for the safe installation, operation, and maintenance of your bicycle rack. Please read these instructions carefully before installation and retain them for future reference. This rack is designed to securely store one bicycle, optimizing space in your garage or home.
2. Nga Tohutohu Haumaru
- Ensure the mounting surface (wall) is structurally sound and capable of supporting the rack's weight plus the maximum bicycle weight (up to 35 kg). Consult a professional if unsure about wall integrity.
- Use appropriate mounting hardware for your specific wall type (e.g., concrete, brick, wood studs). Hardware is typically not included and must be purchased separately.
- Do not exceed the maximum load capacity of 35 kg (77 lbs). Overloading can cause damage to the rack, wall, and bicycle, and may result in injury.
- Install the rack at a height that allows for safe and easy loading/unloading of the bicycle without strain.
- Tirohia ngā here katoa i ia wā, i ia wā, kia mau ai, kia piri tonu ai.
- Keep children and pets away from the installation area during setup and ensure the bicycle is securely mounted to prevent accidental falls.
- Avoid hanging items other than bicycles on the rack.
3. Ihirangi mokete
Manatokona kei te noho nga waahanga katoa i mua i te tiimata o te whakaurunga:
- 1x WilTec Wall Mount Bicycle Rack main unit
- 1x Lower wheel support bracket
- Pukapuka Tohutohu (tenei tuhinga)
Note: Mounting hardware (screws, anchors) is not included and must be selected based on your wall type.
4. Tatūnga me te Tāuta
Proper installation is crucial for the safety and stability of the bicycle rack. Follow these steps carefully:
4.1. Kōwhiria he Tauwāhi
Select a sturdy wall in your garage, shed, or home. Ensure there is enough clear space around the chosen area for the bicycle to be mounted and swiveled without obstruction.
4.2. Mark Drilling Points
Hold the main rack unit against the wall at the desired height. Use a pencil to mark the drilling points for the mounting screws. Ensure the rack is level before marking. The rack measures approximately 11.8 x 63.8 x 58.3 cm (width x height x depth when extended).
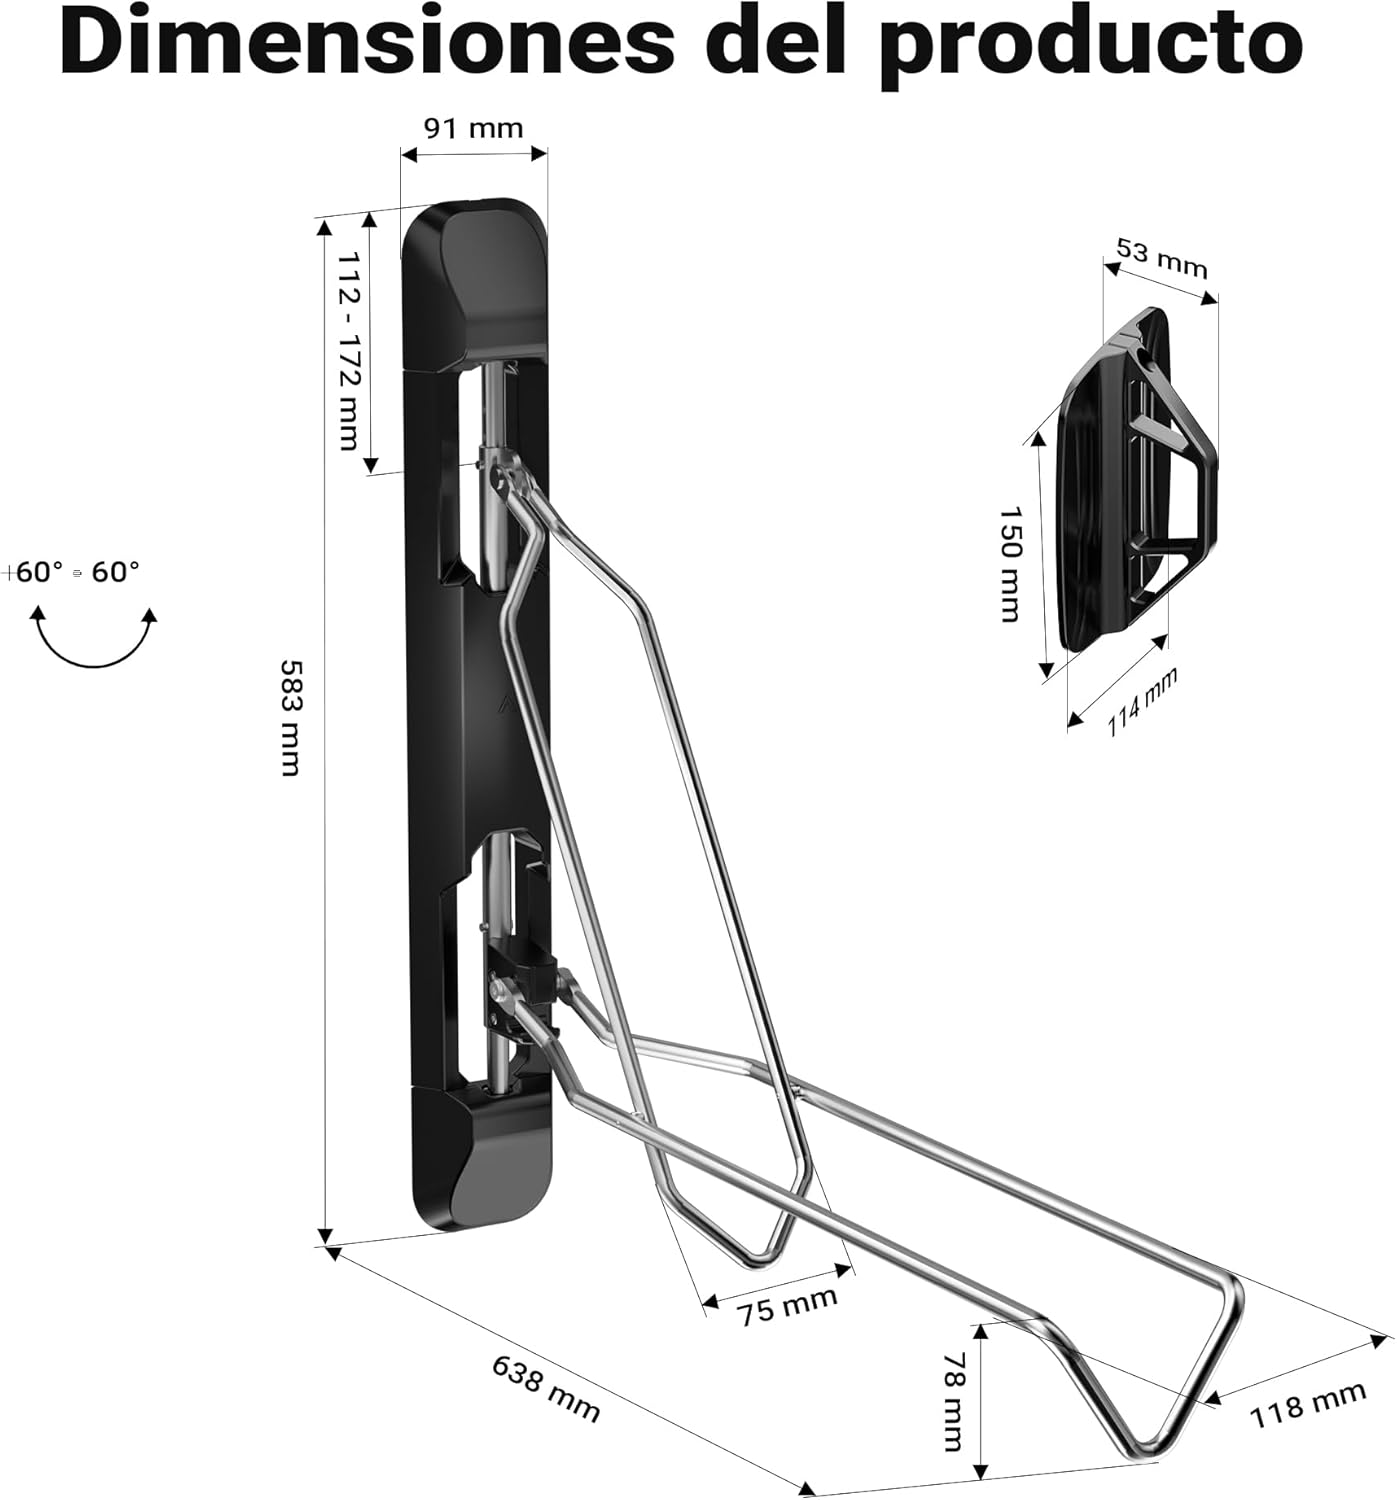
Figure 1: Product Dimensions and Swivel Range
4.3. Drill Holes and Install Anchors
Drill holes at the marked points using a drill bit appropriate for your chosen mounting hardware and wall type. Insert wall anchors if necessary (e.g., for drywall or hollow walls).
4.4. Mount the Main Rack Unit
Align the rack with the drilled holes and secure it to the wall using appropriate screws. Tighten all screws firmly, but do not overtighten.
4.5. Install the Lower Wheel Support
Position the lower wheel support bracket directly below the main rack unit, ensuring it aligns with where the bicycle's rear wheel will rest. Mark drilling points, drill holes, and secure the bracket to the wall.
4.6. Adjust Height (5-Stage Adjustment)
The main rack unit features a 5-stage height adjustment mechanism. This allows you to customize the rack's height to accommodate different bicycle sizes and wheel diameters (508mm-737mm) and tire widths (53mm-71mm). Adjust the height by releasing the locking mechanism, sliding the arm to the desired position, and re-engaging the lock.

Figure 2: Foldable Design, 5-Step Height Adjustment, and Tire Stop

Figure 3: Tire Compatibility
5. Nga Tohutohu Whakahaere
5.1. Mounting a Bicycle
- Ensure the rack arms are extended and locked into position.
- Lift the bicycle by its front wheel and guide it into the main rack unit. The front wheel should rest securely in the upper hook.
- Lower the rear wheel until it rests on the lower support bracket. The tire retainers on both the upper and lower supports help protect the bicycle and the wall from scratches.
- Verify that the bicycle is stable and securely held by both the upper and lower supports. The rack is designed for easy loading without heavy lifting, supporting bikes up to 35 kg.

Figure 4: Easy Bicycle Mounting and 35kg Capacity
5.2. Swiveling the Bicycle for Space Optimization
The rack features swivel arms that allow the mounted bicycle to be rotated up to 60 degrees to either side. This helps optimize space, especially in narrow areas.
- With the bicycle securely mounted, gently push or pull the bicycle to rotate it along the rack's pivot point.
- Rotate the bicycle until it is in the desired position, closer to the wall.

Figure 5: Compact Design with Swivel Function
5.3. Folding the Rack
When not in use, the rack can be folded against the wall to save space.
- Tangohia te paihikara mai i te whatanga.
- Release the locking mechanism on the rack arms and fold them upwards against the wall.

Figure 6: WilTec Wall Mount Bicycle Rack in Use

Figure 7: Versatility for Various Bicycle Types
6. Tiaki
- Te horoi: Horoia te whatanga me te panuiamp cloth to remove dust and dirt. Avoid abrasive cleaners that could damage the finish.
- Taki Tiaki: Periodically inspect all mounting screws and connections to ensure they are tight. Retighten if necessary.
- Tirohanga kino: Check the rack for any signs of wear, damage, or deformation. If any damage is found, discontinue use and replace the affected parts or the entire unit.
7. Te Raru
- Kare e tau te whatanga: Ensure all mounting screws are securely tightened. Verify that the wall structure is adequate for the load. If the issue persists, consult a professional for wall assessment.
- Bicycle does not fit: Check the tire diameter and width against the specifications (508mm-737mm diameter, 53mm-71mm width). Adjust the 5-stage height setting to accommodate your bicycle's size.
- Rack arms do not fold/extend smoothly: Check for any obstructions or debris in the hinge mechanism. Apply a small amount of silicone lubricant if needed.
8. Whakatakotoranga
| Āhuahira | Whakatakotoranga |
|---|---|
| Tau tauira | 65353 |
| Ahu (Whakaroa) | 11.8 x 63.8 x 58.3 henemita (Whānui x Teitei x Hōhonu) |
| Taumaha | 2.48 kg |
| Te Kaha Uta Morahi | 35 kg |
| Bicycle Capacity | 1 Paihikara |
| Whakatikatika Teitei | 5-stage |
| Koki Hurihuri | ±60° |
| Diameter o te Tāia Hototahi | 508mm - 737mm |
| Compatible Tire Width | 53mm - 71mm |
| Rauemi | High-quality steel (implied from image) |
| Whenua Taketake | Haina |
9. Pūtāhui me te Tautoko
For warranty information or technical support, please refer to the purchase documentation or contact WilTec customer service directly. Keep your proof of purchase for any warranty claims.
Wiltec Wildanger Technik GmbH
For contact details, please visit the official WilTec webpae, tirohia ranei to putunga hua.


