1. Kupu Whakataki
This manual provides detailed instructions for the safe and efficient use of your Rfiver Mobile TV Stand with Power Outlet, Model B0F89BJFHH. Please read this manual thoroughly before assembly and operation to ensure proper setup and to prevent damage or injury. Keep this manual for future reference.
2. Nga Hua o te Hua
The Rfiver Mobile TV Stand is designed for versatility and convenience, offering a range of features to enhance your viewte wheako.
- Hototahi Whānui: Supports most 13-50 inch LCD/LED/OLED Flat/Curved screens or monitors with a maximum load capacity of 55 lbs. Compatible with VESA mounting patterns from 75x75mm to 200x200mm.
- Putanga Hiko Whakauru: Features a built-in power strip with 4 AC outlets (120V/12A) and a 6.5-foot heavy-duty extension cord. Includes a one-touch power switch for electrical safety.
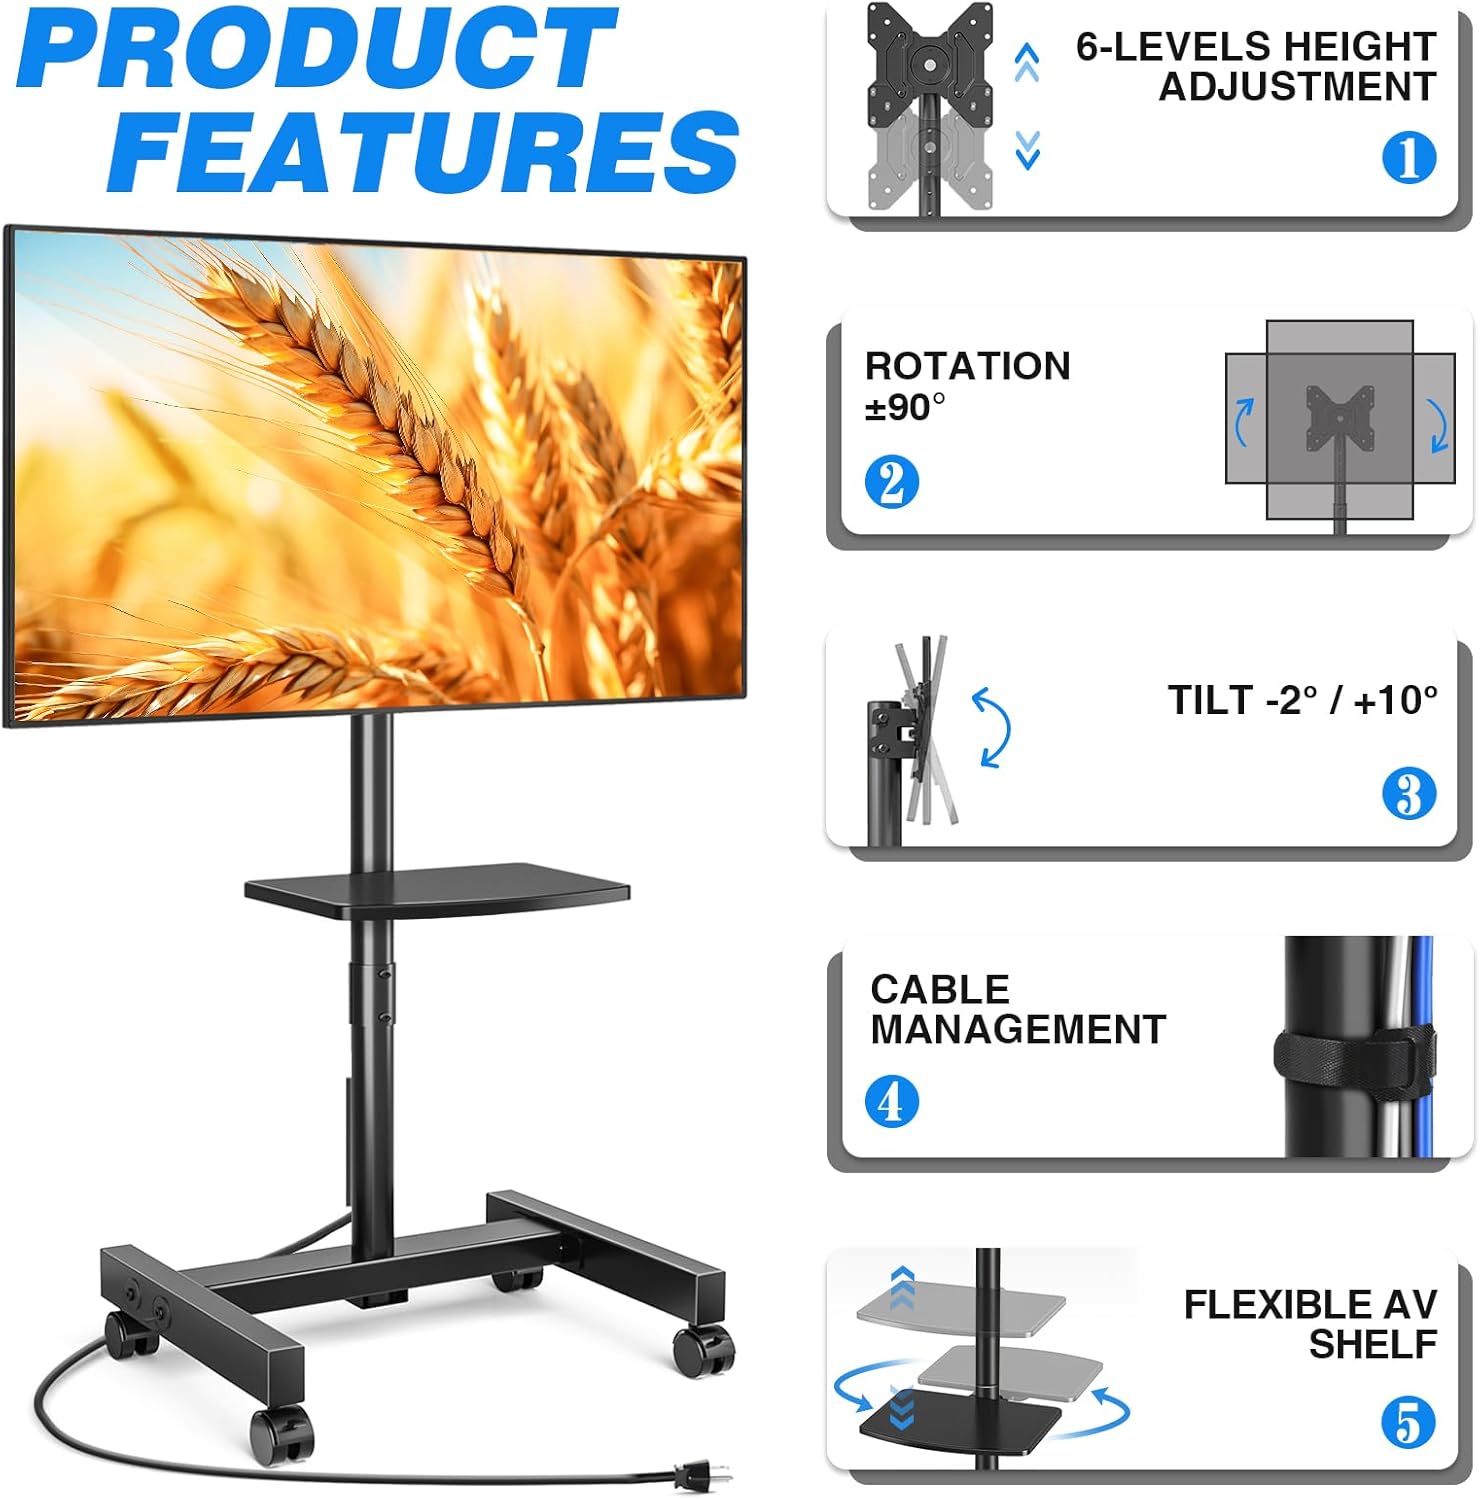
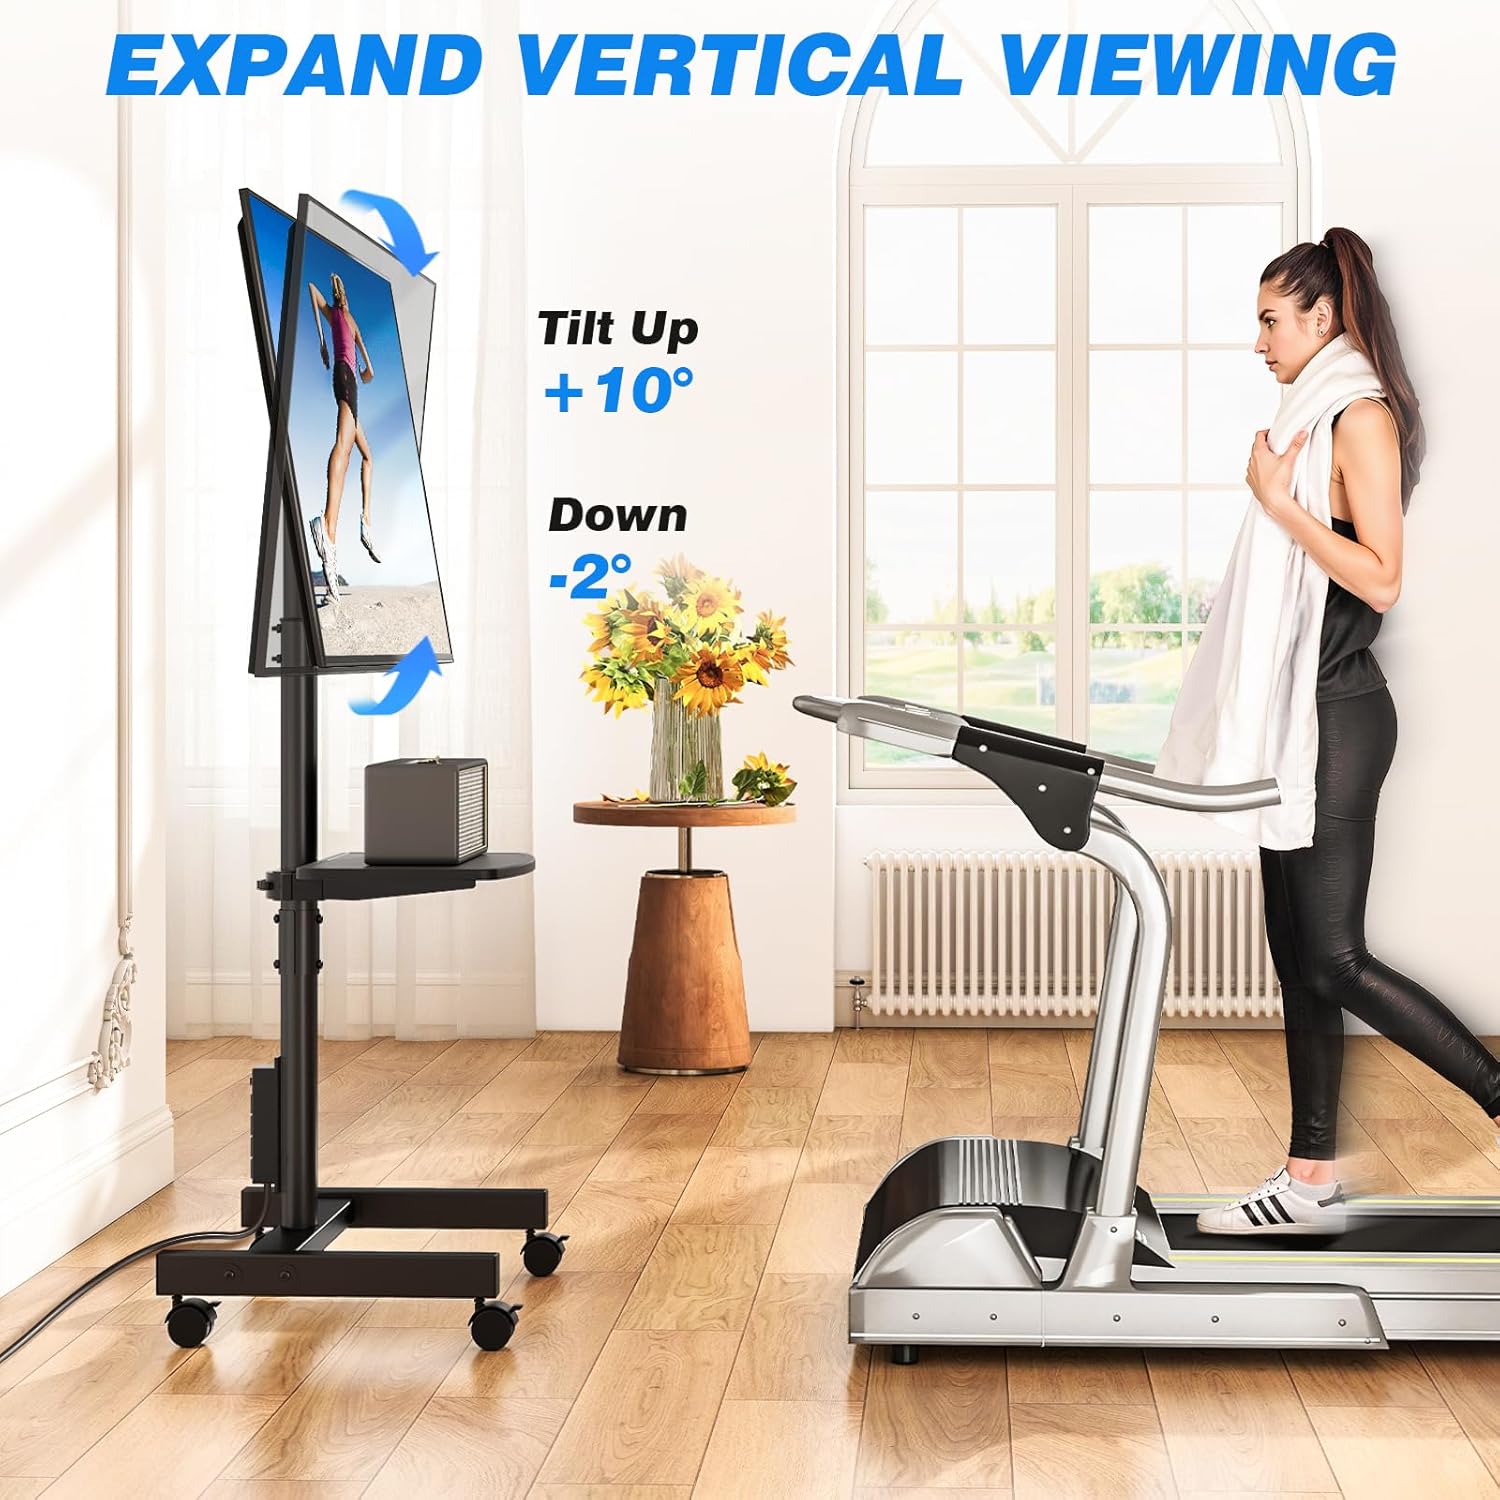
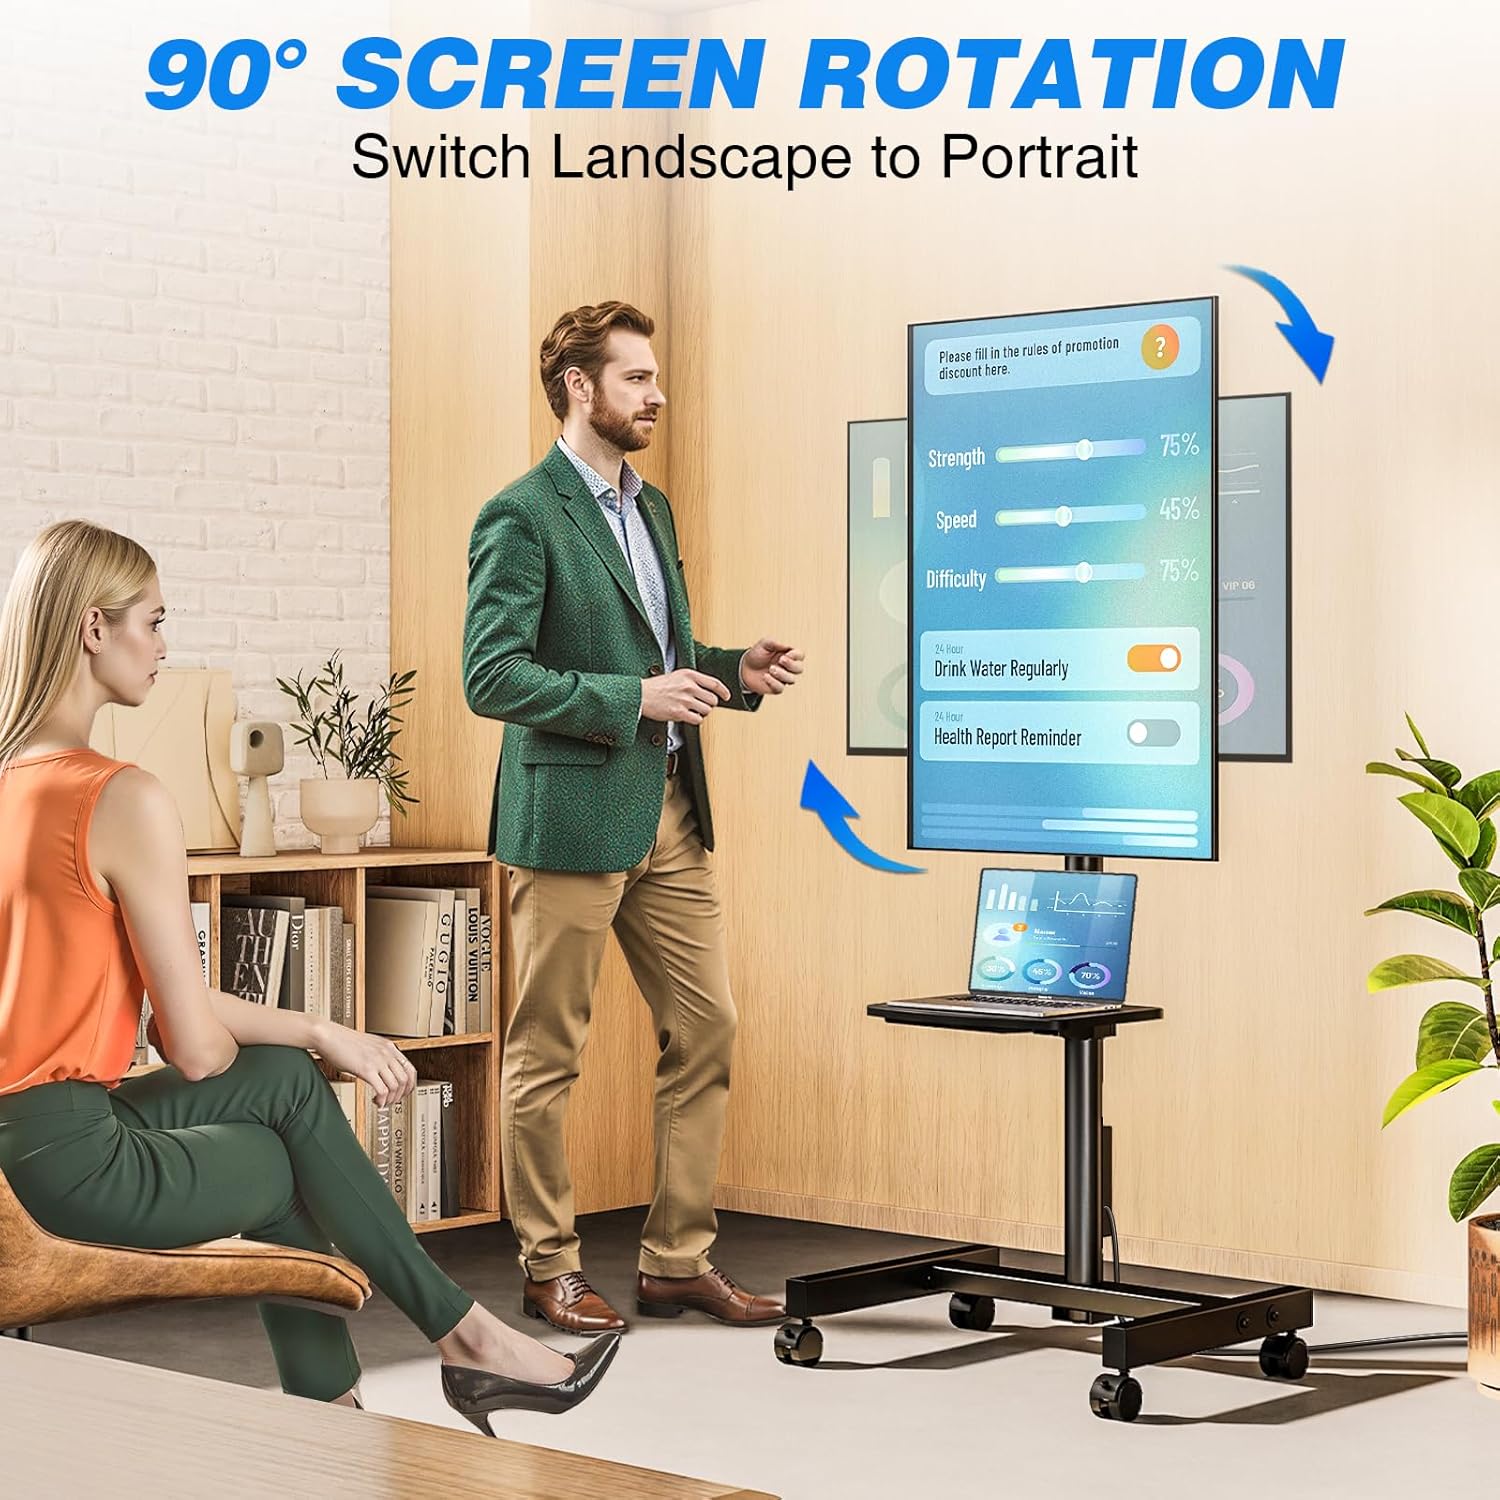
- Whakatikatika Koki Hangore: Allows TV rotation between portrait and landscape modes (90 degrees). Tilt angle adjustment from +10° to -2° for optimal viewing.
- Whakatikatika Teitei: Offers 6 levels of height adjustment to position the screen at eye level.
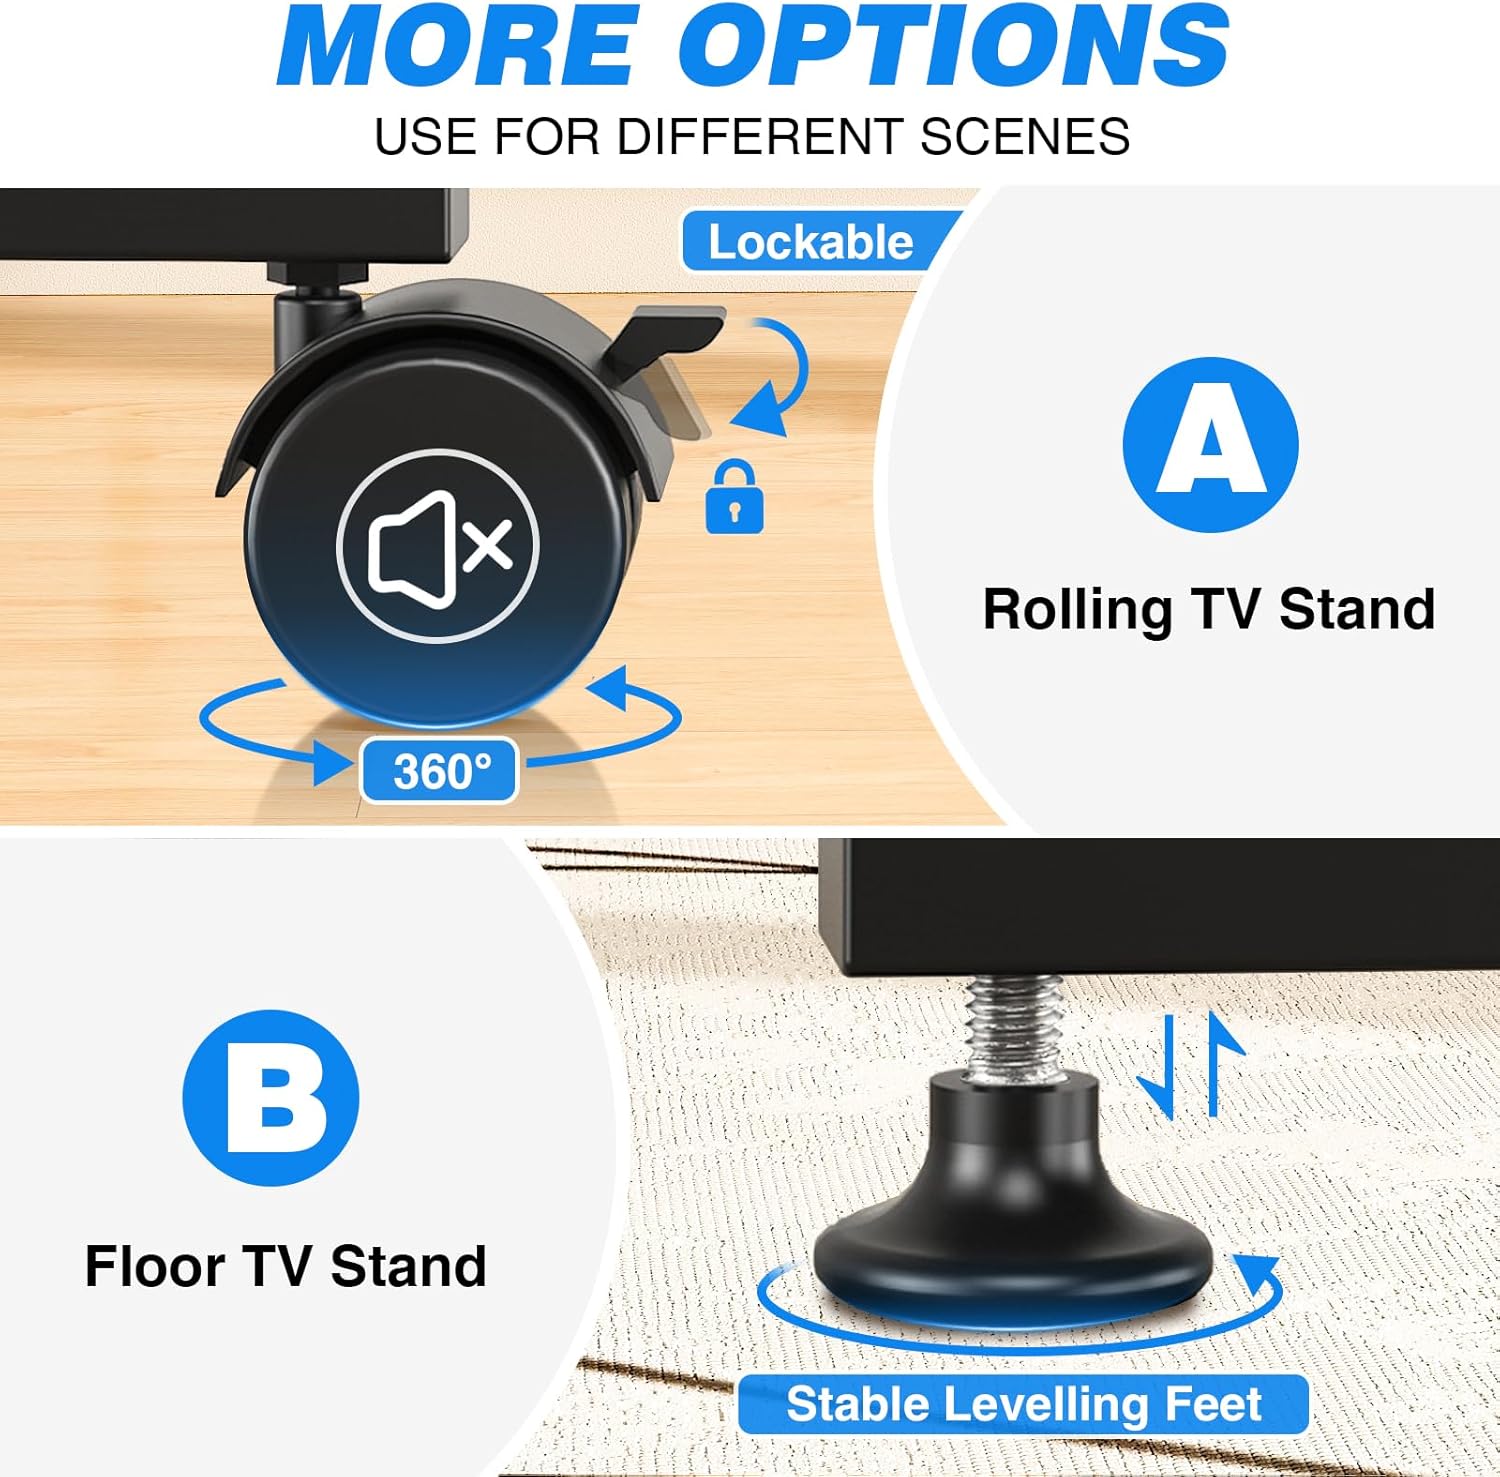
- Mobile or Fixed Use: Comes with both 360° rotating lockable castors for easy mobility and adjustable feet for stable, stationary use on various surfaces.
- Hoahoa Tiaki Mokowā: Compact design allows placement close to walls or behind furniture. Integrated cable management system keeps wires organized.
- Adjustable Media Shelf: Includes a shelf for media devices or accessories.
Whakaaturanga Neke Atuview
Putanga Hiko Whakauru

Ka taea te whakarite Viewi nga Koki
Kōwhiringa nekeneke
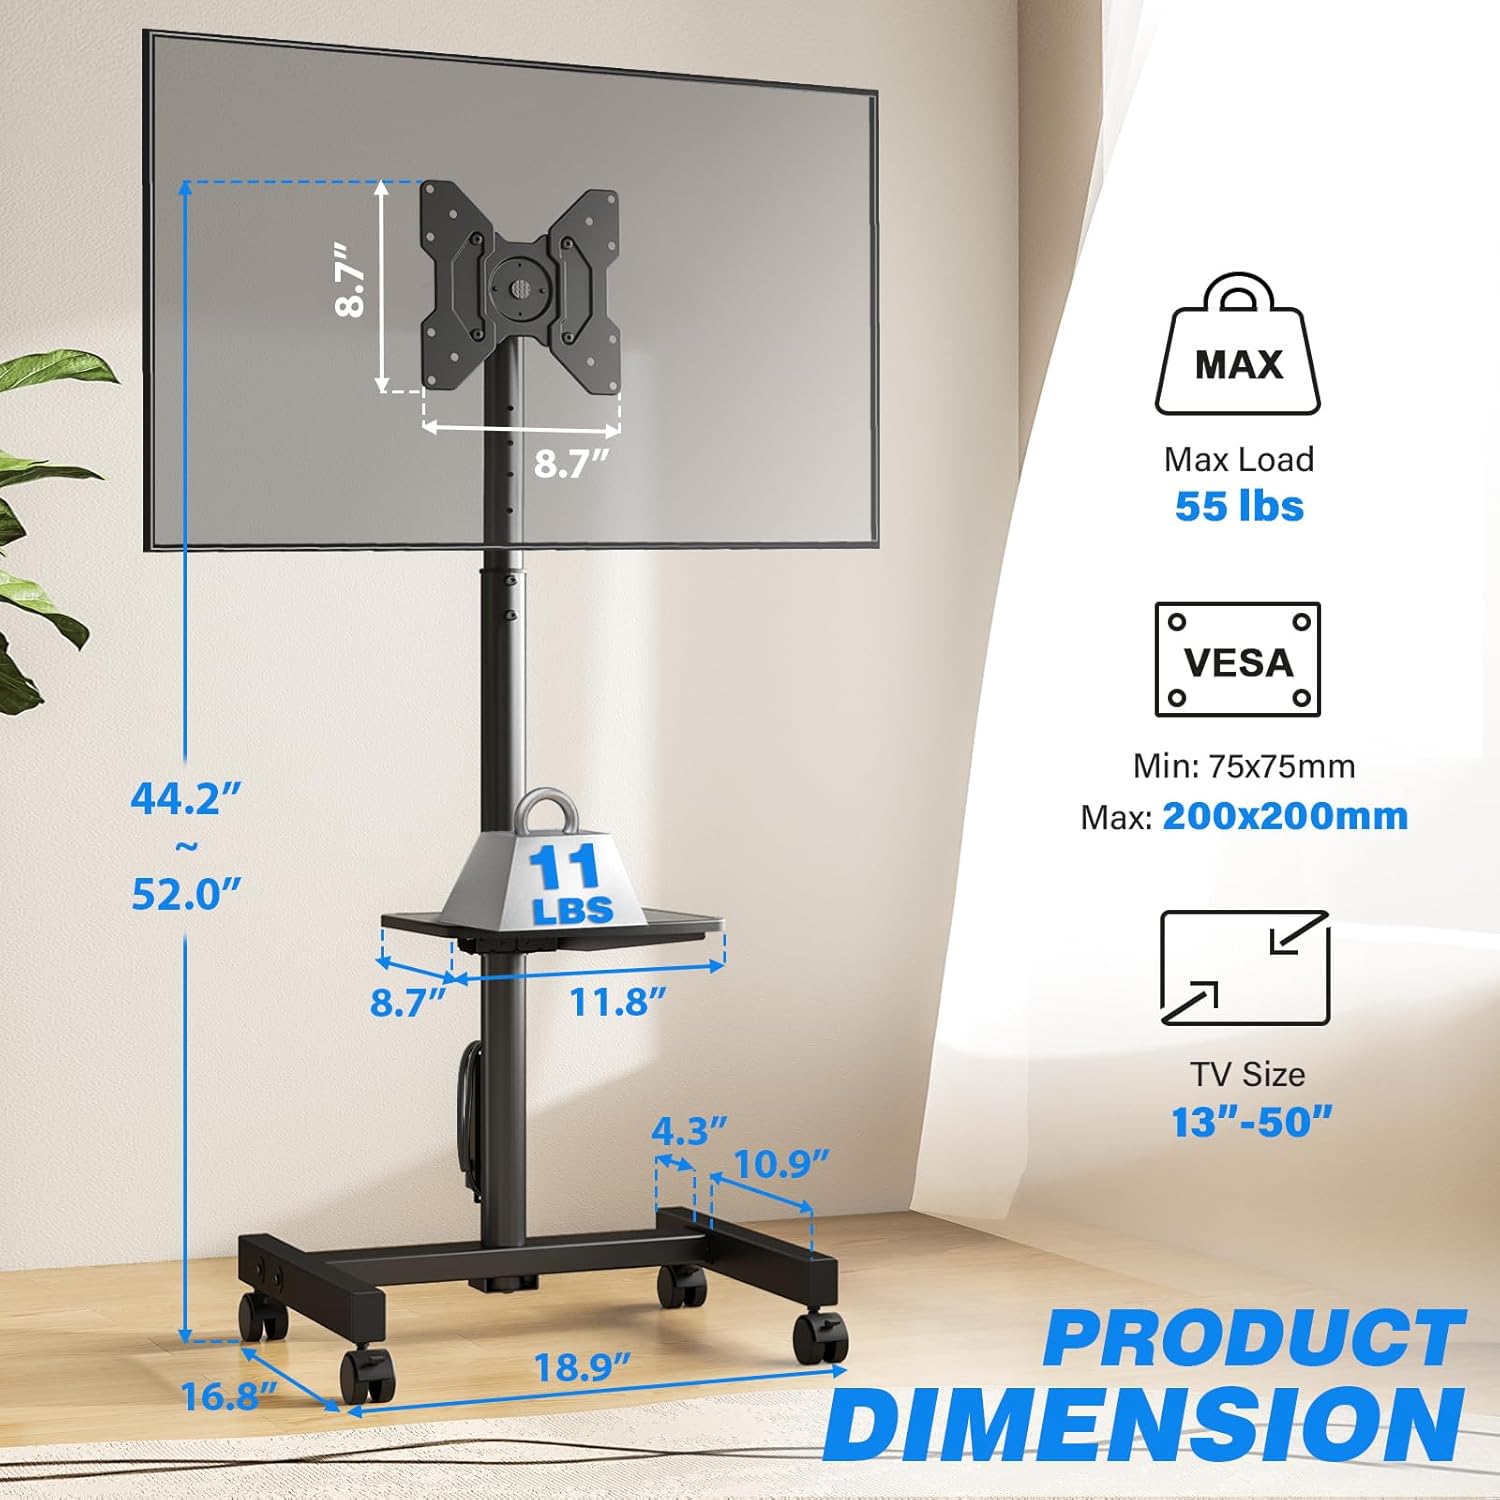
Product Dimensions and VESA Compatibility
Awhe Whakatikatika Teitei

Ataata Hua
Ko tenei ataata e whakaatu ana i te tirohangaview of the Rfiver Rolling TV Stand's features, including height adjustment, adjustable storage shelf, 90-degree vertical assembly, tilt functionality, cable management, integrated power outlet, and VESA compatibility.
3. Whakatakotoranga
| Huanga | Uara |
|---|---|
| Waitohu | Rfiver |
| Tau tauira | B0F89BJFHH |
| Taumaha Tūemi | 12.45 pauna |
| Hunga Hua | 18.8 x 16.8 x 52 inihi |
| Tae | Pango |
| Rauemi | Te whakarewa |
| Momo Whakaeke | Maunga Papa |
| Momo Nekehanga | Hurihuri |
| Pūrere Hototahi | Aroturuki, Pouaka Whakaata |
| Koki Honga Morahi | +10° / -2° |
| Hototahi Rahi TV | 13-50 inihi |
| Te Kaha Uta Max | 55 lbs |
| VESA Hototahi | 75x75mm ki te 200x200mm |
| Papata mana | 4 AC outlets (120V/12A), 6.5ft cord |
4. Nga korero haumaru
Kia mau ki nga whakaritenga haumaru e whai ake nei hei aukati i te whara, i te kino ranei o te hua:
- Kaua e neke ake i te kaha o te utaina o te 55 lbs (25 kg).
- Me whakarite kei roto te tauira whakapiri VESA o tō pouaka whakaata i te awhe e tautokona ana (75x75mm ki te 200x200mm).
- Always follow assembly instructions carefully. Incorrect assembly can lead to product failure.
- Distribute weight evenly on the media shelf. Do not overload.
- When moving the stand, ensure all wheels are unlocked. Lock wheels when the stand is in its desired position to prevent accidental movement.
- Keep children and pets away from the stand during assembly and adjustment.
- Kaua e ngana ki te whakarerekē i te hua. Mā ngā whakarerekētanga katoa ka whakakorea te pūtāhui, ā, ka puta he tūponotanga mō te haumaru.
- Ensure the power outlet is properly grounded and rated for the connected devices. Do not exceed the power strip's electrical limits (120V/12A).
5. Ihirangi mokete
Before beginning assembly, verify that all parts are present and undamaged. Refer to the included assembly instructions for a complete list of components and hardware.
- TV Stand Base (with pre-installed power outlet)
- Poutū Tautoko Poutū
- Pouaka Whakapiki TV
- Adjustable Media Shelf
- Set of 360° Rotating Lockable Castors
- Set of Adjustable Leveling Feet
- Hardware Kit (screws, washers, spacers for TV mounting and stand assembly)
- Assembly Tools (e.g., Allen wrench, open-end wrench)
- Pukapuka Kaiwhakamahi
6. Nga Tohutohu Huihuinga
Assembly typically requires two people. Follow the step-by-step instructions provided in the separate assembly guide included with your product. Ensure all connections are secure before mounting your TV.
- Wetewete me te Manatoko: Carefully unpack all components and compare them against the parts list in your assembly guide.
- Huihuia te turanga: Attach the vertical support pole to the base. Decide whether to install the lockable castors for mobility or the adjustable leveling feet for a stationary setup.
- Install Media Shelf: Secure the adjustable media shelf to the vertical support pole at your desired height.
- Whakapirihia nga Taiapa pouaka whakaata: Secure the TV mounting brackets to the back of your television using the appropriate screws, washers, and spacers from the hardware kit. Ensure VESA compatibility.
- Maunga te TV: Carefully lift and attach the TV (with brackets) to the main mounting plate on the stand. Secure it according to the assembly guide.
- Whakaha Uepu: Route all cables through the integrated cable management system to maintain a tidy appearance.
Note: Detailed diagrams and specific hardware identifiers are found in the dedicated assembly manual.
7. Nga Tohutohu Whakahaere
7.1 Te Whakatikatika i te Teitei
The TV stand offers 6 levels of height adjustment. To adjust the height:
- Loosen the locking mechanisms on the vertical support pole.
- Carefully raise or lower the TV to the desired viewte teitei.
- Securely tighten all locking mechanisms to prevent the TV from slipping.
7.2 Tilting the TV
The TV mount allows for a tilt range of +10° (up) to -2° (down).
- Locate the tilt adjustment knobs or bolts on the TV mounting bracket.
- Loosen them slightly.
- Adjust the TV to your preferred tilt angle.
- Tighten the knobs/bolts firmly to secure the TV in place.
7.3 Rotating the TV (Portrait/Landscape)
The TV can be rotated 90 degrees to switch between portrait and landscape orientations.
- Ensure there is sufficient clearance around the TV to rotate it without hitting obstacles.
- Carefully rotate the TV to the desired orientation.
- The mount is designed to hold the TV securely in both positions.
7.4 Te Whakamahi i te Putanga Hiko Whakauru
The stand includes a power strip with 4 AC outlets.
- Plug the stand's 6.5-foot power cord into a wall outlet.
- Connect your TV and other media devices to the 4 AC outlets on the power strip.
- Use the one-touch power switch to turn the power strip on or off, conserving energy when devices are not in use.
7.5 Moving the Stand (with Castors)
If you have installed the lockable castors:
- Ensure all castor locks are disengaged before moving.
- Gently push the stand to its new location.
- Once in position, engage all castor locks to prevent unwanted movement.

8. Tiaki
- Te horoi: Horoia te turanga ki te ngohengohe, damp kakahu. A ape i nga kai horoi me nga whakarewa ka taea te pakaru i te mutunga.
- Taki Pūmārō: Periodically check all bolts and screws to ensure they remain tight and secure. Retighten as necessary.
- Whakaha Uepu: Ensure cables are neatly routed and not pinched or stressed.
- Castors/Feet: If using castors, keep them free of debris. If using leveling feet, ensure they are stable and adjusted correctly.
9. Te Raru
| Raruraru | Take pea | Rongoā |
|---|---|---|
| TV is not stable/wobbles | Loose bolts; uneven floor; overloaded. | Check and tighten all assembly bolts. Ensure the stand is on a level surface. If using leveling feet, adjust them. Do not exceed weight capacity. |
| TV cannot be tilted/rotated | Locking mechanisms are too tight; obstruction. | Loosen tilt/rotation bolts slightly. Check for any cables or objects obstructing movement. |
| Ko te putanga hiko kaore e mahi | Stand's power cord unplugged; power switch off; circuit breaker tripped. | Ensure the stand's power cord is securely plugged into a live wall outlet. Press the one-touch power switch on the power strip. Check your home's circuit breaker. |
| Stand is difficult to move (with castors) | Castor locks engaged; debris in castors. | Disengage all castor locks. Clean any hair or debris from the castor wheels. |
10. Pūtāhui me te Tautoko
Rfiver products are designed for durability and performance. For warranty information, technical support, or to order replacement parts, please refer to the warranty card included with your product or visit the official Rfiver website. Please have your model number (B0F89BJFHH) ready when contacting support.
Mōhiohio Whakapā:
- Webpae: Rfiver Official Store on Amazon
- Īmēra: Tirohia ki te kohinga hua, whai mana ranei webpaetukutuku mō te īmēra ratonga kiritaki.