1. Kupu Whakataki me nga Korero Haumaru
This manual provides essential instructions for the safe and efficient operation, maintenance, and troubleshooting of your KATOOL ME-T500 Tire Changer and ME-B600 Wheel Balancer Combo. Please read this manual thoroughly before operating the equipment.
1.1 Nga Aratohu Haumaru Whanui
- Me mau tonu ngā taputapu tiaki whaiaro (PPE) e tika ana, tae atu ki ngā mōhiti haumaru, ngā karapu, me ngā pūtu maitai.
- Ensure the equipment is installed on a level, stable surface and securely anchored to prevent movement during operation.
- Kia ma te waahi mahi me te whakamarama pai.
- Kaua e whakahaere i te miihini mena kua pakaru, kua ngaro ranei etahi waahanga.
- Momotuhia te hiko i mua i te mahi tiaki, whakatikatika ranei.
- Never exceed the maximum pressure ratings for tires or the machine.
- Puritia nga ringa me nga kakahu kia matara mai i nga waahanga neke.
2. Nga Waahanga Nekeview
The KATOOL ME-T500/ME-B600 Combo includes the following main components and accessories:

Whakaahua 2.1: KATOOL ME-T500 Tire Changer and ME-B600 Wheel Balancer Combo with included accessories.
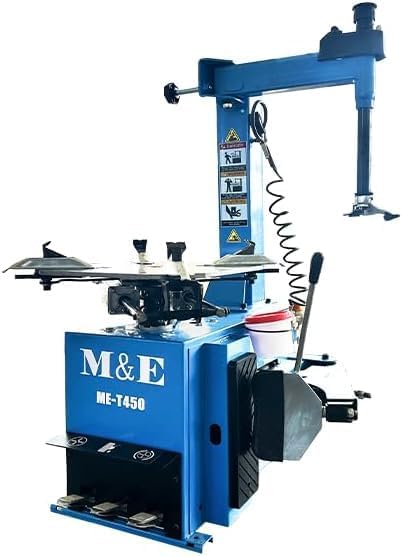
Whakaahua 2.2: Te taha view of the KATOOL ME-T500 Tire Changer, highlighting its robust construction.

Whakaahua 2.3: KATOOL ME-B600 Wheel Balancer, showing the control panel and various balancing accessories.
2.1 Tire Changer (ME-T500)
- Waeine Matua: Heavy-duty frame with integrated air cylinder.
- Papamahi: Four-jaw clamping system for securing wheels.
- Mounting Head (Bird Head): Stainless steel construction for durability and scratch resistance.
- Rima Piu: Fast swing arm design for quick positioning.
- Kaiwhakapakari Pīri: Side-mounted, pneumatic bead breaker.
- Waewaewae: Simple foot-pedal controls for various operations.
- 40mm Hex Bar: Heavy-duty hex bar for mounting/demounting, resisting flexing.
2.2 Wheel Balancer (ME-B600)
- Waeine Matua: Sturdy base with integrated balancing shaft.
- Paewhiri Mana: Digital display and buttons for program selection and data input.
- Wheel Mounting Cone: For securing wheels onto the balancing shaft.
- Apatoko: Wheel weights, caliper, and other balancing tools.
2.3 Nga Taapiringa Tae
- Tire lever/Mounting bar
- Bead breaker covers (plastic)
- Mounting paste and brush
- Inflation hose with pressure gauge
- Wheel weights (various types)
- Wheel caliper
3. Tatūnga me te Tāuta
Proper setup is crucial for the safe and effective operation of your KATOOL combo machine.
3.1 Te Wetewete me te Tirotiro
- Wetekina marietia ngā wāhanga katoa, ka tirohia mēnā kei roto ngā mea e hiahiatia ana i te rārangi tākai.
- Inspect for any shipping damage. Report any damage immediately to the carrier and supplier.
3.2 Location and Anchoring
Choose a location with sufficient space around the machine for safe operation and tire handling. The machine must be anchored to a concrete floor to prevent movement during use. Ensure the floor is level.
3.3 Te Hononga Rererangi
Connect the machine to a clean, dry compressed air supply capable of providing the required working pressure (0.8 MPa). Ensure all air connections are secure and leak-free.
3.4 Hononga Hiko
Connect the machine to an appropriate electrical outlet (110V/220V/380V, 50/60HZ, depending on your model). Ensure the power supply matches the machine's requirements.
4. Operating the Tire Changer (ME-T500)
Whāia ēnei mahi mō ngā mahi whakawhiti potae haumaru, whai hua hoki.

Whakaahua 4.1: Ka taea te whakarite clampkei runga i te tēpu hurihuri, e urutau ana ki ngā rahi o ngā potae rerekē.
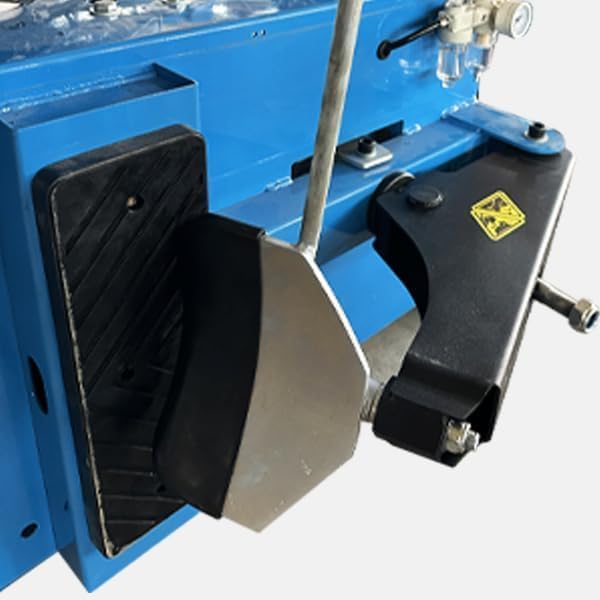
Whakaahua 4.2: Simple foot-pedal controls for intuitive operation of the tire changer.
4.1 Te Pakarutanga o ngā Pīni
- Position the wheel on the side-mounted bead breaker. Ensure the tire is flush against the machine to prevent movement.
- Apply the bead breaker paddle to the tire sidewall, close to the rim but avoiding the tire pressure sensor (TPMS) valve.
- Slowly actuate the bead breaker pedal to push the bead off the rim. The bead breaker provides up to 5500 LBS of force.
- Repeat for both sides of the tire.
4.2 Clamping the Wheel
- Place the wheel onto the turntable. The machine supports outside clampte (10"-19") me te roto o te whareampte rahi (12"-21").
- Use the foot pedal to actuate the four clamping jaws, securing the wheel firmly. Ensure the jaws are properly engaged to prevent slippage.
4.3 Demounting the Tire
- Lubricate both tire beads with mounting paste.
- Position the stainless steel mounting head (bird head) just above the rim edge.
- Use the tire lever to pry the top bead over the mounting head.
- Hurihia te tēpu hurihuri mā te whakamahi i te pātara waewae hei tango katoa i te pirepire o runga.
- Repeat for the bottom bead.
4.4 Mounting the Tire
- Lubricate both tire beads and the rim edges with mounting paste.
- Place the bottom bead of the new tire onto the rim, ensuring it sits in the drop center.
- Position the mounting head and use the foot pedal to rotate the turntable, guiding the bottom bead onto the rim.
- For the top bead, ensure the tire is pushed down into the notch of the rim. Use the tire lever to guide the top bead over the mounting head while rotating the turntable.
4.5 Te pikinga
- Remove the wheel from the machine before inflating. Never inflate a tire while it is clamped i runga i te miihini.
- Connect the inflation hose with pressure gauge to the tire valve.
- Inflate the tire to the manufacturer's recommended pressure. Listen for the beads to seat with an audible 'pop'.
4.6 Operational Tips for Rim Protection
To prevent scratching alloy rims, especially during bead breaking and mounting/demounting:
- Use plastic bead breaker covers on the bead breaker paddle.
- Ensure the tire is flush against the bead breaker pad to minimize movement.
- When demounting/mounting, ensure the stainless steel bird head is properly adjusted to clear the rim. A slight gap (e.g., 1/4 inch) between the head and the rim is ideal to account for tire deflection.
- Whakamahia i nga wa katoa ample tire mounting paste on both beads and rim edges.
- Consider using additional plastic protectors on the clamping jaws if working with delicate rims.
Video: Tire Changer Operation Tips (External Resource)
This video demonstrates practical tips for using a tire changer, including techniques to avoid scratching rims and proper bead breaking. (Source: XK988)
Video: BILT HARD 2.0HP 110V Swing Arm Tire Changer Overview
Ko tenei ataata he tere tereview of the BILT HARD 2.0HP 110V Swing Arm Tire Changer, showcasing its key features and operation. (Source: Weize)
5. Operating the Wheel Balancer (ME-B600)
Proper wheel balancing is essential for vehicle safety and tire longevity.

Whakaahua 5.1: KATOOL ME-B600 Wheel Balancer with key dimensions indicated.
5.1 Te Whakamau i te Wira
- Tīpakohia te koeko whakairi tika mō te kōhao waenga o te wira.
- Mount the wheel securely onto the balancer's shaft. Ensure it is centered and tightened with the quick-release nut.
5.2 Inputting Wheel Data
- Using the caliper, measure the wheel's diameter, width, and distance from the machine.
- Input these measurements into the balancer's control panel.
- Select the desired balancing program (e.g., static, dynamic, alloy).
5.3 Balancing Procedure
- Close the wheel guard (if applicable) and press the START button. The machine will spin the wheel and calculate the required weight and location.
- The display will indicate the amount of weight needed for both the inner and outer planes, and where to place them.
- Apply the correct weights to the indicated positions on the rim.
- Spin the wheel again to verify the balance. Repeat the process if necessary until the display shows '0' or an acceptable tolerance.
Video: Wheel Balancer Operation Tips (External Resource)
This video demonstrates practical tips for using a wheel balancer, including techniques for accurate weight placement. (Source: XK988)
6. Tiaki
Regular maintenance ensures the longevity and optimal performance of your equipment.
6.1 Tiaki i ia ra
- Clean the machine surfaces, turntable, and mounting head after each use.
- Check air lines and connections for leaks.
- Inspect bead breaker paddle and mounting head for wear or damage.
6.2 Tiaki ia wiki
- Lubricate moving parts, such as the swing arm pivot points and air cylinder rods, with a light oil (e.g., WD-40).
- Check and clean the air filter/regulator.
6.3 Tiaki Marama
- Tirohia ngā pūtu me ngā here katoa mō te piripono.
- Check the condition of electrical cables and connections.
- Verify the accuracy of the pressure gauge.
7. Te Raru
Ko tenei waahanga e whakarato ana i nga otinga mo nga take noa ka pa ki a koe.
| Raruraru | Take pea | Rongoā |
|---|---|---|
| Ko te miihini kaore i te hiko | No power supply; tripped breaker | Check power connection; reset breaker |
| Tire changer not clamping/unclamping | Insufficient air pressure; air leak; jammed jaws | Check air supply; inspect for leaks; clear obstructions |
| Bead breaker not working effectively | Low air pressure; improper tire positioning | Verify air pressure; reposition tire flush against pad |
| Wheel balancer giving inconsistent readings | Improper wheel mounting; incorrect data input; machine not calibrated | Remount wheel securely; re-enter data; perform calibration (refer to specific balancer manual) |
| Tire difficult to mount/demount | Insufficient lubrication; improper technique; stiff tire | Apply more mounting paste; review operating steps; use helper arm if available |
8. Whakatakotoranga
Technical specifications for the KATOOL ME-T500 Tire Changer and ME-B600 Wheel Balancer Combo.

Whakaahua 8.1: Key specifications for the KATOOL Tire Changer, including max tire diameter and width.

Whakaahua 8.2: Detailed specifications table for the KATOOL Tire Changer.
8.1 KATOOL ME-T500 Tire Changer
- Rim Clamping (Outside): 10"-19"
- Rim Clamping (Inside): 12"-21"
- Max. Tire Diameter: 960mm (38")
- Max. Tire Width: 410mm (17")
- Table Top Rotation Speed: 6 RPM
- Bead Breaker Force: 5500 LBS
- Pēhanga Mahi: 0.8 MPa
- Hiko Motini: 0.75KW - 1.1KW
- Taumaha Tukunga: 510 LBS (230 KG)
- Haruru Mahi: <70dB
- Gearbox Motor: 110V/220V/380V, 50/60HZ
- Ahu: 39"x33"x37"
8.2 KATOOL ME-B600 Wheel Balancer
Specific technical specifications for the ME-B600 Wheel Balancer are typically found in its dedicated manual. General features include:
- Computerized balancing system.
- Digital display for precise readings.
- Multiple balancing modes (static, dynamic, alloy).
9. Pūtāhui me te Tautoko
KATOOL offers various protection plans for your equipment, including 2-Year and 3-Year Protection Plans, as well as a Complete Protect monthly plan. For detailed warranty information, service, or technical support, please refer to your purchase documentation or contact KATOOL customer service directly. Always provide your model number (ME-T500 / ME-B600) and serial number when seeking support.


