1. Nga korero haumaru
Tena panuihia nga tohutohu katoa i mua i te whakaurunga me te mahi. Ki te kore e whai i enei tohutohu ka puta pea he ru hiko, he ahi, he whara kino ranei.
- Haumaru Hiko: Ensure the power supply is disconnected before performing any installation, maintenance, or troubleshooting. All electrical connections must comply with local codes and regulations. This device operates on 110/220V AC.
- Kaimahi Tohu: Installation and wiring should only be performed by a qualified electrician or trained professional.
- Haumaru wai: Avoid direct contact with water when the device is powered on. Ensure all connections are watertight and protected from moisture.
- Whakamahinga Whakamahinga: This controller is designed for water level management in sump pits, water tanks, and similar applications. Do not use for purposes other than its intended design.
- Parenga taumaha: The unit includes built-in overload protection. Do not bypass or modify this safety feature.
2. Hua Neke Atuview
The Ortis Electronic Adjustable Float Switch Controller is an advanced water level management system designed for reliability and versatility. It features dual sensors, LED indicators for status monitoring, and supports both drain and fill modes with adjustable load running options.
Āhuatanga matua:
- Aratau Takirua: Supports both drainage and water replenishment (fill) operations.
- Adjustable Load Running Modes: Three selectable modes for optimized pump control.
- Dual Hi-Lo Sensors: Patented 304 stainless steel electrodes offer corrosion resistance and long lifespan (up to 10 years maintenance-free).
- No Moving Parts: Ensures stable and reliable operation, unlike traditional float switches.
- Tohu LED: Provides instant visual feedback on system status and selected mode.
- Matohi Matohi: Built-in overload protection and real-time alarms for pump failures, clogs, or abnormal discharge.
- Hototahi Ao: Compatible with sump and utility pumps rated up to 2Hp/20A.
Waehanga:
- Ortis Water Level Controller Unit
- Dual Hi-Lo Electrode Sensors (pre-attached)
- Waea Hiko me te Mono

Whakaahua 1: The Ortis Water Level Controller unit with its dual electrode sensors and power cord. This image displays the main control unit, which features an input/output socket, LED indicators for Drain, Water, DisAlarm, Auto, Off, On, and Load, along with a Mute button. Two sensors are connected via cables, ready for installation.
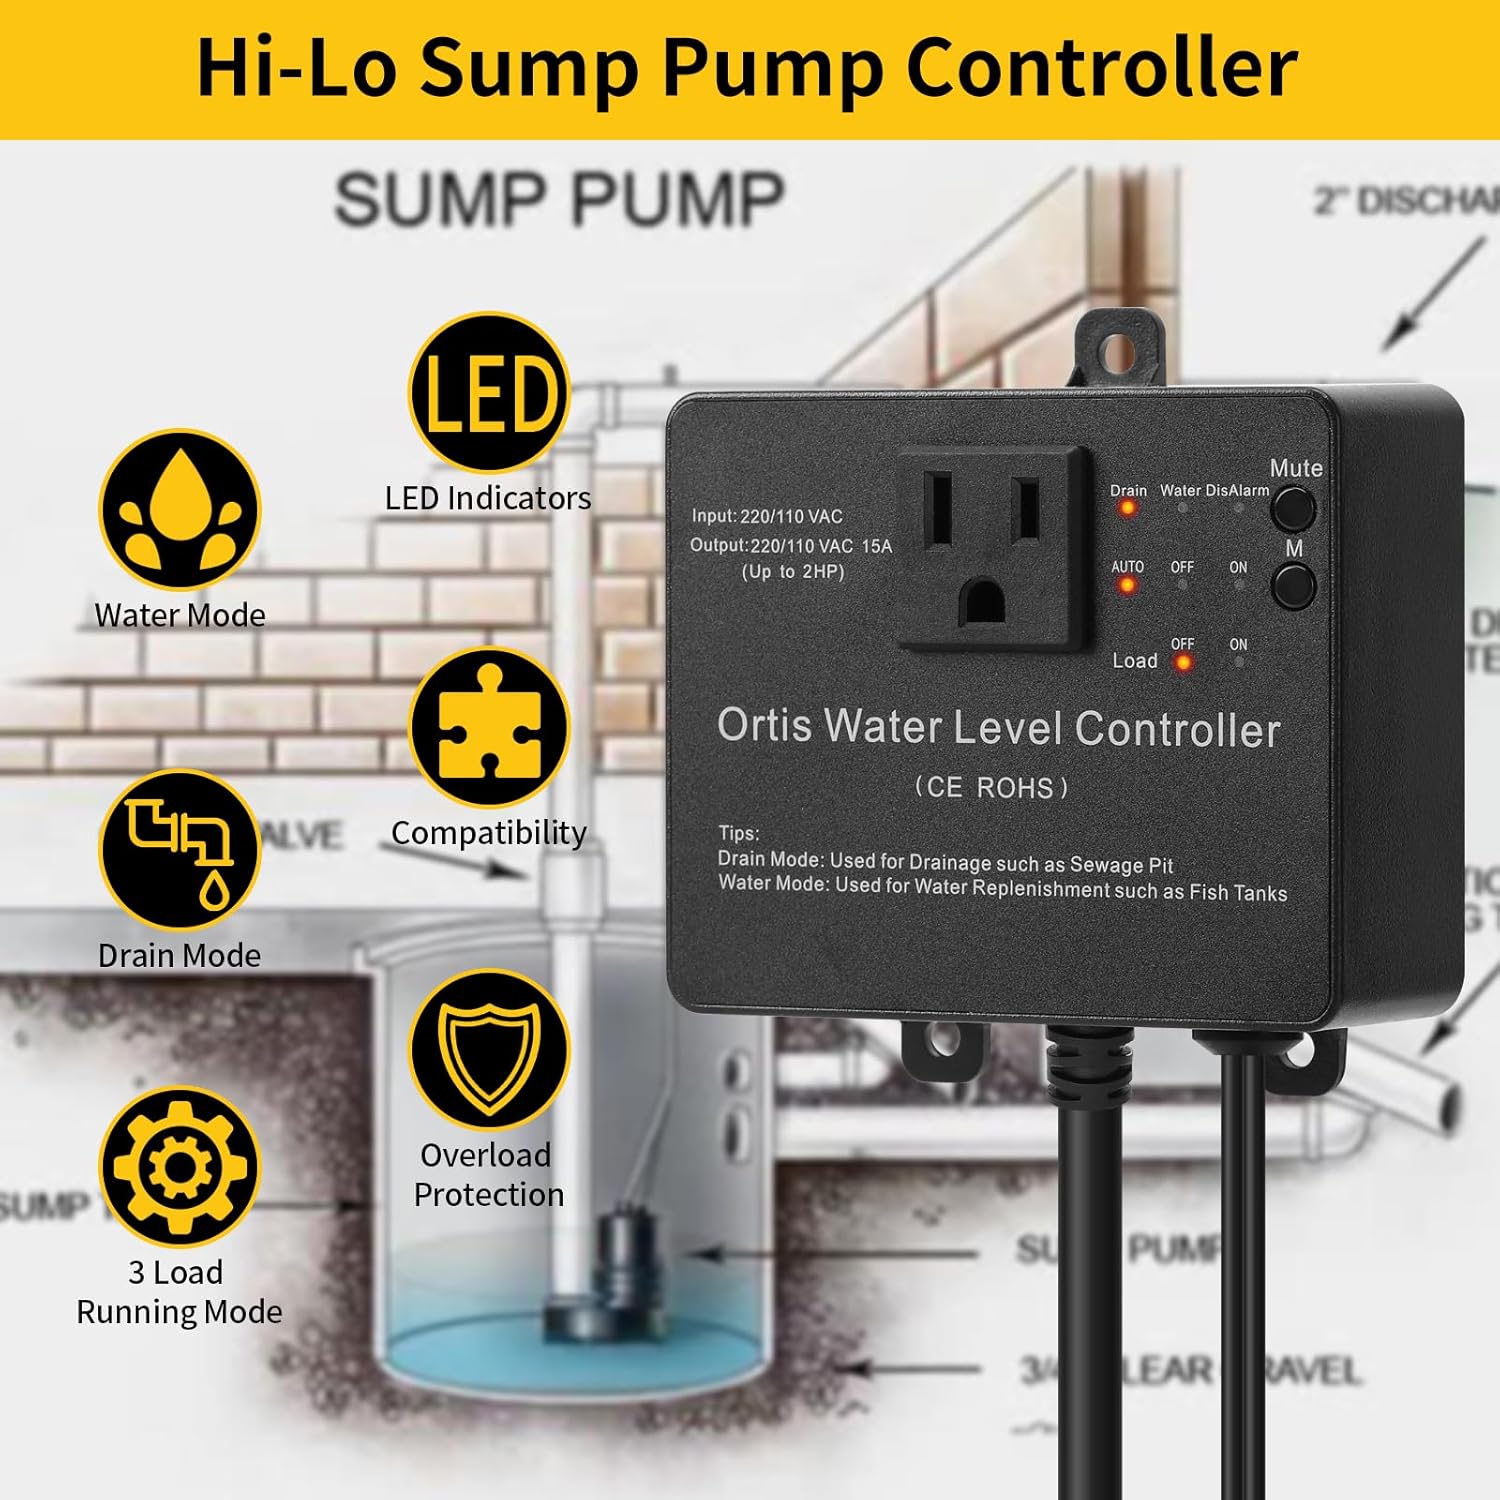
Whakaahua 2: He mutuview of the Ortis Hi-Lo Sump Pump Controller's key features. This diagram highlights LED indicators, Water Mode, Drain Mode, 3 Load Running Modes, Compatibility, and Overload Protection, illustrating the versatility and safety aspects of the device.
3. Tatūnga & Tāuta
3.1 Controller Unit Installation
The controller unit can be installed using two primary methods:
- Whakapiki taiepa: Use screws to secure the controller to a wall or vertical surface. Ensure it is mounted in a dry location, away from direct water exposure.
- Adhesive Hook Mounting: For temporary or non-invasive installations, an adhesive hook can be used to hang the controller. Ensure the surface is clean and dry before applying the hook.

Whakaahua 3: Illustration of the two installation methods for the Ortis Water Level Controller: screw mounting to a wall and hanging with an adhesive hook. The image shows the back of the controller with a keyhole slot for hanging and mounting tabs for screws.
3.2 Whakaaturanga Whakaoho
The dual electrode sensors are designed for adjustable water level detection. They can be positioned to detect water levels within a range of 0.5 inches to 20 inches.
- Turanga: Place the sensors in the water tank, sump pit, or reservoir where water level monitoring is required. The sensors should be vertically oriented.
- Te Whakarite i Te Teite: The high (Hi) and low (Lo) sensors can be adjusted independently along their cables to set the desired activation and deactivation points for your pump. The distance between the two sensors determines the operational range.
- Securing Sensors: Use the provided suction cups or cable ties to secure the sensor cables and electrodes in place, preventing movement that could affect accuracy.

Whakaahua 4: Diagram illustrating the adjustable range of the Ortis water level sensors, from 0.5 inches to 20 inches. It shows how the individual sensors can be moved along a vertical rod to set precise high and low water detection points. An inset shows a close-up of a single sensor with its installation method.
3.3 Hononga Hiko
- Tuku Hiko: Plug the controller's power cord into a standard 110V or 220V AC outlet.
- Hononga Puma: Plug your sump pump or utility pump into the output receptacle on the Ortis controller. Ensure the pump's electrical rating does not exceed 2Hp/20A.

Whakaahua 5: An illustrative diagram showing a typical installation of the Ortis Water Level Controller in a sump pit. The controller is wall-mounted, and its sensors are submerged in the pit, connected to a sump pump. This visual guide demonstrates the physical setup and connections.
4. Nga Tohutohu Whakahaere
The Ortis controller offers intuitive operation with LED indicators and a mode selection button.
4.1 Kōwhiringa Aratau
The controller supports two main operational modes: Aratau Whakarere a Water Mode (Fill). It also features three adjustable load running modes.
- Aratau Rere: Ideal for sump pits and sewage pits. The pump activates when water reaches the high sensor and deactivates when it drops below the low sensor, effectively draining the area.
- Water Mode (Fill): Suitable for water tanks or fish tanks. The pump activates when water drops below the low sensor and deactivates when it reaches the high sensor, replenishing the water.
- Load Running Modes: Refer to the detailed instructions in the included quick start guide for specific configurations of the three load running modes. These modes allow for fine-tuning of pump cycling behavior.
4.2 Tohu LED
The front panel features several LED indicators to provide real-time status information:
- Drain LED: Illuminates when the controller is operating in Drain Mode.
- Water LED: Illuminates when the controller is operating in Water Mode (Fill).
- DisAlarm LED: Indicates a system alarm (e.g., pump failure, clog, abnormal discharge).
- AUTO/OFF/ON LEDs: Show the current operational state of the pump (Automatic, Off, or Manually On).
- Load LED: Illuminates when the connected pump is actively running.

Whakaahua 6: He tata view of the Ortis Water Level Controller's LED indicators and control buttons. This image details the 'Drain', 'Water', 'DisAlarm' LEDs, the 'Mute' button, and the 'AUTO', 'OFF', 'ON' selection buttons with their corresponding 'Load' indicator, providing a clear guide to the user interface.
4.3 Intelligent Overload & Failure Alerts
The controller is equipped with advanced safety features:
- Parenga taumaha: Automatically activates when the current drawn by the connected pump exceeds 23A, preventing damage to the pump and controller.
- Ngā Whakaoho Wā-tūturu: The system provides alerts for pump failures, clogs, or abnormal discharge conditions. The 'DisAlarm' LED will illuminate.
- Mahi Wahangu: An alarm can be silenced for up to 24 hours by pressing the 'Mute' button, useful during temporary maintenance or inspection.
5. Tiaki
The Ortis Electronic Adjustable Float Switch Controller is designed for minimal maintenance.
- Horoi Sensor: The 304 stainless steel electrode sensors are corrosion-resistant and designed to be maintenance-free for up to 10 years. However, in environments with heavy mineral buildup or debris, occasional inspection and gentle cleaning of the electrodes may be beneficial to ensure accurate readings. Always disconnect power before cleaning.
- Wāhanga Kaiwhakahaere: Keep the controller unit clean and dry. Wipe with a soft, damp cloth if necessary. Do not use abrasive cleaners or immerse the unit in water.
- Tirohanga taura: Periodically inspect all cables for signs of wear, damage, or fraying. Replace any damaged cables immediately.
6. Te Raru
This section provides solutions to common issues you might encounter with your Ortis Water Level Controller.
| Raruraru | Take pea | Rongoā |
|---|---|---|
| Pump does not turn on/off as expected. | Incorrect sensor placement or adjustment. Incorrect mode selection (Drain/Water). Power supply issue to controller or pump. | Verify sensor heights and ensure they are clean. Check if the correct mode (Drain or Water) is selected. Ensure controller is plugged in and pump is securely connected to controller. Check circuit breaker. |
| DisAlarm LED is illuminated. | Pump failure or clog. Abnormal discharge. Te taumahatanga nui. | Inspect the pump for clogs or mechanical failure. Clear any obstructions. Check for blockages in the discharge line. If due to overload, ensure pump rating is within controller limits (max 2Hp/20A). Press 'Mute' to silence alarm for 24 hours if needed for inspection. |
| Controller unit has no power. | Kāore anō kia mono katoatia te taura hiko. Kaore he hiko mai i te putanga. Internal fuse (if applicable) blown. | Me mohio kua honoa te taura hiko ki te putanga ora. Whakamātauria te putanga hiko ki tētahi atu taputapu. Tirohia te pūwehe ara iahiko. Contact customer support if power issue persists after checking outlet. |
| Sensors appear to be malfunctioning. | Excessive mineral buildup or debris on electrodes. Damaged sensor cable. | Disconnect power and gently clean electrodes. Reinstall. Inspect sensor cables for cuts or damage. If damaged, contact customer support for replacement. |
7. Whakatakotoranga
| Āhuahira | Taipitopito |
|---|---|
| Tau tauira | ETC-106 |
| Whakauru Voltage | 220/110 VAC |
| Putanga o naianei | 15A (Up to 2HP) |
| Hangarau Hoko | Electrode Sensor (304 Stainless Steel) |
| Adjustable Sensor Range | 0.5 inihi ki te 20 inihi |
| Parenga taumaha | Activates at >23A |
| Hunga Hua | 2"L x 1"W x 3"H (Controller Unit) |
| Taumaha Tūemi | 1.01 pauna |
| Tikanga Mana | Touch (Button Interface) |
| Nga Waahanga kei roto | 1 x Ortis Water Level Controller |
8. Pūtāhui me te Tautoko
For specific warranty information, please refer to the documentation included with your purchase or contact Ortis customer support directly. General support inquiries can be directed to the manufacturer via their official website or the contact information provided at the point of purchase.
When contacting support, please have your product model number (ETC-106) and purchase date available.


